Restoring Returns
ATX’s Backup and Restore functions work in tandem. Only data that has been backed up by ATX may be restored using the Restore function.
To restore backed up returns and related data:
- Click the Returns menu; then, select Restore Returns.

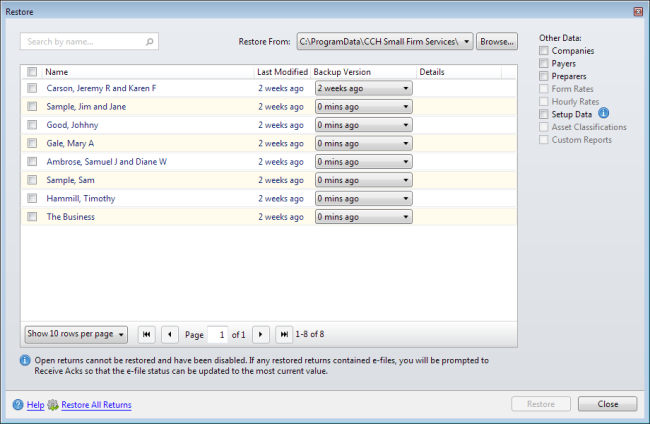
Restore dialog box
Returns that are marked as Open may be open on another network user's computer. Open returns will not be restored.
- Do one of the following:
- Select the check box(es) for the return(s) to be restored or select the Name check box.
Enter text into the Search by name... to show only those returns matching the criteria entered.
- To restore all returns, click the Restore All Returns link.
- Note the information listed under the Last Modified and Backup Version columns and either select which backup version to restore or leave the default setting to restore the most recent version.
If there are multiple backup versions of a particular return, the versions are listed in the drop-down list in the Backup Version column.
- Click Browse to navigate to and select another backup location if desired
- Under Other data:, select the check box(es) for Companies, Payers, Preparers, Form Rates, Hourly Rates, or Setup Data as desired to be restored.
- Click Restore.
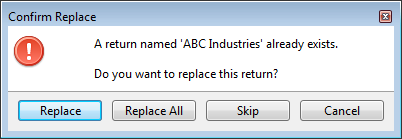
Returns of the same name on your system must be replaced. Existing returns can be renamed if you would prefer to keep the old and new versions. See Renaming Returns.

- Do one of the following:
- Click Replace to replace only the return named in the message.
You will be asked again for each return that has a match on your system.
- Click Replace All to replace all returns being restored without being asked about any other returns in the batch.
- Click Skip to skip the return named in the message.
Skipped returns will not be restored.
- Click Cancel to abort the action.
- Click Close.
See Also: